Wednesday, February 29, 2012

I Need To Do This Every Morning!

I think I can learn a lot from this little girl. Sometimes I wonder why us women are so hard on ourselves. Is it because if we actually say we are good at something or our life is great, that it comes across we are being stuck up? I think we need to speak more positively in our homes, about our lives, and especially about us as individuals....

Check out the cute video


I may not get on my bathroom counter and stare my self down in the mirror, but I will start each morning with what I am blessed with... (okay between you and me I may get on the counter ;) )

Monday, February 27, 2012

Fabric Lined Drawers


Covering your drawers with fabric is very easy. I used very similar technique I used for my mouse pad.


Step 1. Trace and cut out your fabric to fit the inside of your drawer

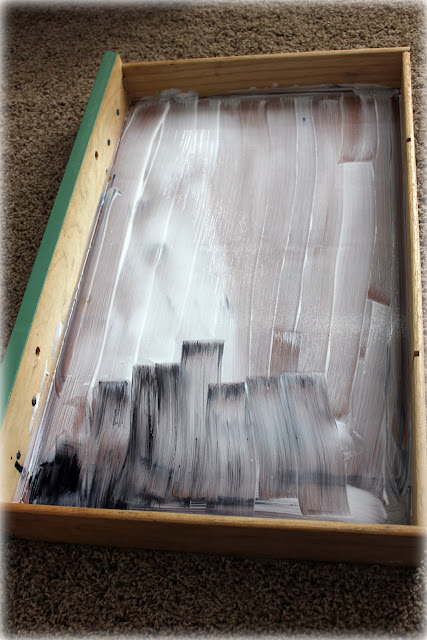
Step 2. Generously Mod Podge the bottom of the drawer.


(don't mind the black gross stuff. Hopefully yours wont have that)


Step 3. Apply fabric and allow for it to dry. I used a rag to smooth out any bumps in the fabric. Start in one corner and smooth out to the edges. This way if there are any bumps it would be in the back corners where no one will see anyways, unless you take a picture to blog about it ;) 


Step 4. On the top of the fabric, apply a thin coat of mod podge and allow that to dry.  Your done! Easy peasy right?


To see the whole desk transformation click here

Sunday, February 26, 2012

Simple Things Sunday

Simple Things Sunday is where I share the simple things that made me smile during the week...

Enjoy!


Jaxon and my dad cuddling. This is a rare moment because until now he did not like my parents. Every time he saw them he would cry and cling to me.
 My mom taught me how to knit


Went on date to the Vow with my hubby. First movie together in over a year in a half.


After the movie we came home and Chase wanted to make me dinner. The Vow must of inspired him to be romantic. As I was working on the computer he came up with two kinds of cereal and a carton of milk. It may not be a gourmet meal like Valentines Day, but I will take it. I sure am one lucky girl to have such a sweet husband. P.S. please notice his wash cloth over his arm, he thought he was so funny!

Friday, February 24, 2012

Featured


I just was browsing through Tip Junkie  and noticed that  they featured my sons birthday party yesterday! I couldn't be happier. It makes me feel a little better now after looking at burn marks on my hands from baking so many flipping cookies in a day. (yes I grabbed one to many hot cookie sheets ) :)

Thanks Tip Junkie!

Wednesday, February 22, 2012

Desk Redo


I decided it was time to get rid of my current office desk that had chew marks all over it, which only reminded me why I gave away our dog. Well, that and I was allergic to her. The old desk was fake wood and just a piece of junk. When I saw this new desk at a thrift store for 20 dollars, I knew I had to have it. When looking for furniture to redo I always look at the hardware, shape, and the quality. I pull out all the drawers and examine it thoroughly. Once you think you have a good piece, immediately get a sales rep to put a hold tag on it because if you come back after wondering around the store to think some more about this purchase it could be gone. TRUST ME. It has happened way too many time to me.


To get started take out all the drawers and remove the hardware. Next, give the desk a quick sand. I know some people may skip this step but I swear by it. The top of my desk had veneer on it which makes the primer harder to stick. I don't care what primer I use, I ALWAYS sand.


Tape off parts you don't want painted.


Fix any broken drawers that you may have accidentally broken while loading it into your truck... (this is optional and only if you are clumsy like me ;) ) 


Next, prime. I used 2 thin coats of Gripper primer. Once that is dry (I wait 24 hrs) then paint. I decided on palmetto color. I then finished it off with a quick Krylon Matte spray. Make sure to let it dry for at least 48 hours. I did so many coats because I am very OCD about streaks and if there is one thing wrong I would paint over it, so I needed to wait even longer for it to dry.


After having my desk for a couple days I was sick of looking at this...


So I decided to cover it with fabric. Tutorial HERE


Here is what my office looked like before and now you can see why I bought a new desk. Yeah, I know scary.


Now my office feels more polished and represents me and my husband. Okay so more me than him, but we both agree we like it better than the last desk.


To see how I made this mouse pad you can click here.


To see the other half of my office click here.


Linking up here.

Monday, February 20, 2012

DIY Mouse Pad Tutorial


I recently bought a junky desk and fixed it up and I thought it was time to do the same to my mouse pad. I was sick of looking at this thing that my husband got for free at some convention. It was about time for a makeover. If you also have a ugly mouse pad then this tutorial is for you.

Let's get started...

1. First pick out your fabric. I chose a vintage piece of fabric I found at a local thrift store for a dollar. I loved the color and thought it would work perfectly on my desk. 


2. Stencil the mouse pad onto the fabric and then cut along the lines. Don't worry if it isn't exact, you can trim it down later.  


3. Lightly Mod Podge over the top side of fabric. This will stiffing the fabric and make it easier to apply to the mouse pad. It will also help when you trim the fabric so the fabric doesn't fray. 


4. Once the fabric has COMPLETELY dried, Generously Mod Podge the top of the mouse pad and the back side of the fabric. Once done, adhere the two sides together so the correct side of the fabric is on top.

5. Once that has completely dried, give one more generous coat of Mod Podge to the top of the fabric. 


6. Once dried, inked the edges. This is optional but I think it just polishes off the look. I just used a simple ink pad and a sponge brush.

7. This is the crucial last step. Finish it off with a quick spray of Krylon matte finish. This will help give it that smooth surface so your mouse can slide easily.


YOU'RE DONE! Now go and enjoy your new mouse pad.

Linking up here

Sunday, February 19, 2012

On The Ranch

Over the weekend my little family went up to Huntsville to have our first experience living on a ranch. It was a quick, yet fun getaway. The littles stayed up WAY too late so the next day they sure were cranky, but for the adults it was a blast. We went and stayed up at our friends parents house and played cards, fed fishes, road on a tracker, and of course "attempted" to take some pictures. Our best friends are moving up there in July and we couldn't figure out why they would want to leave us, but after staying up there for the weekend I can see why :(


Now the funny part. Well it wasn't so funny at the time. Do your family photos ever look like this....?


linking up here

New Blog Design


I am SO excited to finally have my new blog design. I hope you all enjoy it as much as I do. It took awhile to get it exactly what I had in mind but thanks to my talented friend Jen from Twiddler House we were able to get it just perfect. She was so fast and easy to work with and I am so grateful I had her to help me. I want to know your thoughts, do you like it? Be kind, but be honest!


Friday, February 17, 2012

Frozen Banana Pops


My son is currently in this stage where he wont eat anything. He is sick, teething, and cranky. I have been struggling to get him to eat anything other than popsicles, until... I thought of Banana Pops. I have made these before but with coconut and chocolate; however, I wanted a healthier alternative for my kid.

What You Need:
* Bananas cut into thirds
* Popsicle sticks. (I used his left from these popsicles. They are perfect because they are mini size)
* Greek yogurt
* Cereal of your choice.

STEP 1: ground up cereal


STEP 2: insert popsicle sticks.


STEP 3: (picture not shown) Freeze/chill the banana pops on some parchment paper. This makes it easier for the yogurt to adhere to the banana.

STEP4: Cover with greek Yogurt.


STEP 5. sprinkle Cereal crumbs on top.

STEP 6: Put finished banana pop back in the freezer until completely frozen. *make sure to put it on parchment paper for easier removal of the pop.

STEP 6. Give it to your cranky child. :)

 By the looks of my kids face this banana pop is a hit!


Wednesday, February 15, 2012

What did you do for Valentines Day?


My Valentines day started out with the conversational heart pancakes and a gift certificate taped to my bathroom mirror for a pedicure. Next, a little craft project from Jaxon to dad. A major melt-down at the grocery store with people staring at me. A trip to the dollar store to get a tacky v-day balloon for Jaxon. Lastly, my husband made me wait upstairs while he made dinner. I thought for sure it was going to be eggs since I think that is the only thing he knows how to cook, but instead he surprised me with salmon. That's right ladies, no scrambled eggs or toast, but some actual food for dinner :) He also managed to end things off right with some cold stone ice cream. I feel so blessed to have such a wonderful man in my life. Cherish anyone you have in your life who treats you the way you have dreamt to be treated. I know I do!

 (please don't mind my make up under my eyes! I just woke up and lets just say this was a good day lol)


 This is Jaxons finger prints but it didn't turn out as successful as I wished. Poor Jax didn't like me pressing his thumb into the paint. He is at that stage where he wants to do everything himself.

(I love the touch of thyme he added, ha! Gosh I love him) 


This is the best part. As he was waiting at the bottom of the stairs for me to come down and see what he made, he told me, "Now Bridget, remember it is the thought that counts, but I have a feeling I should of just bought Wendy's" 


Related Posts Plugin for WordPress, Blogger...