Monday, April 30, 2012

Paper Cone Tutorial


 I love wooden dowels because I feel the crafting options are endless. I used dowels from The Wood Connection to make "Fairy Godmother" Wands  for a Princess Party and this time I am showing you how to make party favor cones on a dowel that I used for a "Rock-a- Bye Baby" baby shower. 


Let's get started...

YOU NEED:

*Medium size dowel cut in thirds. They can cut them right there for you at the store for just pennies.
*8x10 double sided paper of your choice. Mine is all from The Wood Connection.
*Tape
*Stapler. I prefer the long handle kind but you can use any regular stapler. 
*Ribbon of your choice


HOW TO:

This is super easy once you get the hang of it. I took a lot of pictures to help direct you, and it will just take some playing around with to get that first cone. Once you get that first cone, you can use it to shape the others.

The KEY here is you have to have 8x10 paper. Most my paper is 12x12 so, if that is the same for you then just cut it down.


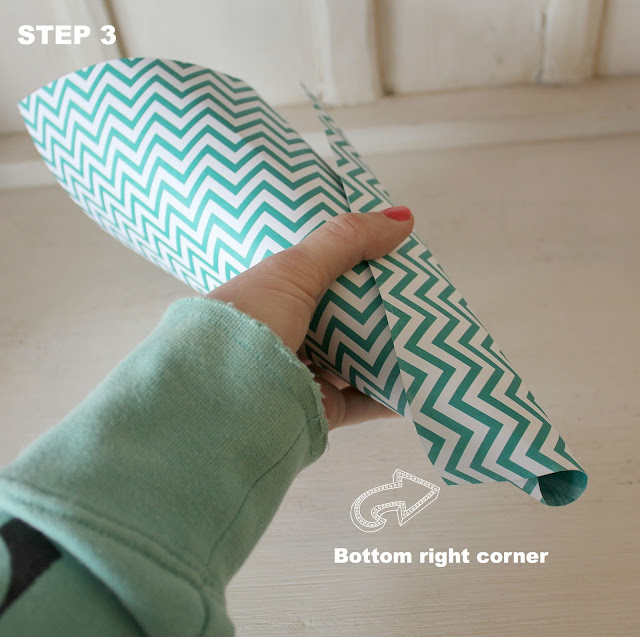
I roll the bottom right hand corner just part of the way to help get its shape.


Wrap the bottom right hand corner around the outside of the bottom left hand corner. This will help form the cone. This should fit nicely around because you already shaped the bottom right corner in step one.


 While holding the bottom right hand corner continue to step 4...


Step 6: While the dowel is in the cone, I will then hot glue the dowel down to the front side of the cone. This will help secure the dowel as well as balance out the cone once there are treats in it. If you don't do this step your cone may tilt once in the styrofoam or vase.


Step 7 decorate with Ribbon of choice. 

WAH-LA! you are done.


I filled my cones with Kool-Aid popcorn. To get that recipe and to see the rest of this "Rock-A-Bye" party click HERE.


Now for the giveaway...


The Wood Connection is giving away 25 dollars away to one of my lucky readers.


HOW TO ENTER:
(one entry for each of the following)


1. Become a follower of my blog.  If you are already a follower, great!!!  Just leave a comment saying so.


2. Follow my facebook page.


3. Share this giveaway on fb, twitter, your blog... where ever :)

Please include your email so I can contact you.


Winner will be announced May 12th. Good Luck!


Disclosure: The Wood Connection gave me all the material in exchange for the post. All opinions and text are my own, as always.

Saturday, April 28, 2012

Wedding


A couple weeks ago I decorated a wedding. The couple wanted teal, green, yellow, and orange for their colors. They requested it to be vintage, boardwalk, bright, and casual. It was a challenge to fit within that theme but I always love a challenge.

      To give it the vintage element,  I added in some "vintage" mason jars with a few other vintage decor items like widow panes, old suit cases, a vintage scale, and lastly some wild flowers wrapped in burlap. 


I had 30 minutes to set up the entire room and it was crazy, but luckily I had a lot of helpers. It was kind of fun bossing them around... is that sad that I enjoyed that part the best ;).  Anyways, since there was a time constraint I was not able to get a lot of pictures before everyone had picked through the main dessert table, plus there was on small disaster... see the last photos.


There was just one disaster for the night and that was the main focus of the dessert table. The wedding cake fell apart when the family went to picked it up at Harmons :( Luckily they were able to get a cake  from another local grocery store just in time for them to cut the cake. 


I want to give a shout out to my amazing sponsor Mimi's Dollhouse for the printables she made for me at last notice. Thanks girl. She has all the printables I have used in my other parties like this one and this one all in her shop.

Wednesday, April 25, 2012

Parenting Magazine

My blog gets a feature in Parenting Magazine this month under "Pinteresting" Party ideas. Thanks to my talented friend Toni who was kind enough to let me help her with some decorations for her killer Monster party. 


Tuesday, April 24, 2012

OH SNAP! I do have friends ;)


snap conference


  Snap Conference had a ton of classes ranging from photoshop to power tools, but the most valuable thing I took away from this was not all the great information taught in the classes but all the friends.... Oh and some SWAG!

 I won't lie, I felt so legit getting a "swag bag" that I didn't even care what was in it, I just felt cool ;)


Yes, this is me laying on my bed surrounded by free things! Yes, I look like a dork and my husband thought it would be funny to document it and yes, I am aware I am posting this and it will be all over the Internet! :)

I highly recommend for anyone to go to a blogger conference and don't be worried if you are going by yourself. These women are genuine and fun. Some of them can even throw down a dance move or two. Sew Dang Cute Crafts even whipped out a round off back handspring at the dance... are you impressed because I am!


 Posh Ideas, Bee in our Bonnet, and a cute girl who is wanting to start a blog.


A bunch of fellow "party" bloggers.


I couldn't help myself.


Lucky for all of us they will be having Snap again next year. If you go to their blog they have some recaps of some amazing classes that was taught during the three day conference.

 Thanks again to all those behind the scenes that put so much time and effort into making this such a great conference. From a girl who throws small parties I know how much work goes into it, so I can only image the work that went into pulling off this beast!

Monday, April 23, 2012

Snap Conference


This past weekend I had the privilege to attend the Snap Conference. I won't lie, I was so nervous to go by myself that I was about to sell my ticket. I was afraid I would be discouraged when I got there because there were so many bigger bloggers than me attending. 

I, and this is for reals, sat in my car and was like, "Bridge, keep it cool, when you see one of your blogging idols don't come across stocker-ish.  Don't gush how amazing you think they are. Act professional. It was if I was preparing myself for that big game day. Ha... well that all went out the window right as I opened the door and ran into the SWEETEST girl Mandy from Vintage Revivals.


Turns out EVERYONE was so kind and I left the first night so excited to go back. So excited in fact that when I came home I was telling my husband all about it while dancing around the kitchen and was like, "these are my peeps. They get me." They enjoy crafts, blogging, taking pictures of EVERYTHING, and they get excited over cordless hot glue guns ;) 

 I often get teased by family members about blogging. 
"Oh bridgey widgey!!"... picture my oldest brother saying that in a high pitch voice as he is poking me in the arm, or if I am about to eat something and one of them says, "oh take a picture, you need to blog about that." So it was so refreshing to be with a bunch of women who all have similar hobbies as myself. 

Now the BIG take away I got from this conference wasn't learning photoshop, or how to network, it was to just BE MYSELF. They stressed the importance of being you because everyone else is taken. I  think a lot of us woman focus so much on the number. The number of followers we have, the number on the scale, the number of dollar bills we have in our wallet. So I think it is very important to not get caught up in that and just be true to yourself. 

My talented friend at Mimi's Dollhouse made this free printable for anyone who wants it. I want to place it next to my computer so when I am blogging I can remember what I learned at this conference. Be myself and hope people like it.

To download this printable click the arrow in the bottom right hand corner. To print, press the image that looks like a printer. This is a 5x7 print. 

To get this printable for free along with others click HERE

Friday, April 20, 2012

Mason Jar Centerpieces


I have always said that what takes a party or event to the next level is all the small details. A wedding is no exception of that. For my latest event, I created some blue "vintage" mason jars that were the center focus for the center pieces. I also made some photo jars that help incorporate the couples photos in a unique way.

Let's get started.....

  I laminated sepia pictures of the couple and shaped them with a rubber band over night. Once the picture is laminated, it is harder for it to hold it's shape. This is why I find that shaping it over night with  a rubber band really helps. Next, double side tape the edges so the picture will now be a circle and a place to hide the flower stems. Place in the jar and fill with water and flowers.


Printable by Mimi's dollhouse

Thursday, April 19, 2012

SNAP Confrence

I am SO excited to be at Snap today. I am a little nervous since I will be attending by myself but I know I will meet some great peeps. I can't wait to come back and share what I learned. There will be a lot of great "party bloggers" there and I will pick their brains with lots of questions :) I will be sharing some photos from the event on my instagram @bridgetparry


EEEEKKK I am excited!


Wednesday, April 18, 2012

DIY "Vintage" Blue Mason Jars


I recently decorated my first wedding, and I used blue mason jars for the centerpieces. If you want to buy an actual antique blue mason jar you will be spending anywhere from 8 to 20 dollars a jar, OR you can make your own for a much better price. Also if you are wanting to put a candle in the jar for a center piece you can not use the antique kind because they have a high possibility of shattering. There for there are many reasons to check out this tutorial. 

Let's get started...

YOU NEED:
* jars  (obviously lol)
*foam paint brush or fan brush
* cheese cloth
* paper towel
*plastic container


HOW TO:

1. Get jars of all shapes and sizes and wash them. My local thrift store has these for 25 cents a piece.


2. Buy Glass paint Vitrea 160 in turquoise and a container of their paint thinner (picture below). Total cost is around 8 dollars and I did about 20 jars with this before the thinner ran out. I ordered paint through amazon HERE and the thinner HERE.


Step 3. With a empty tupperware, I poured 1 spoonful of paint to 3 spoonfuls of thinner.  If you want darker then use less thinner. Below I have a example of a darker tint and a lighter tint of jar.


Step 4. With a foam brush paint around the jar. I first started going up and down but I found that going horizontal around the jar works best. You have to move fast because it will dry fast. There will be some streaks so try your best to smooth them out. I used some cheese cloth to help me around the mouth of the jar to smooth out streaks. However don't worry to much because once you bake them and put water in the jar you will not notice the streaks.

Step 5. Let dry for 24 hours. THIS IS A MUST. Then in a 375 degree oven you will bake them for 45 minutes. This will seal in the paint and allow you to wash the jars in the future.


Printable for the center pieces done by Mimi's Dollhouse
Blue wire from The Wood Connection

Below are a just a few more ideas you can do with mason jars

Another 50 mason jar ideas shared on 
MasonJar50+ 50+ Mason Jar Decor Ideas


Related Posts Plugin for WordPress, Blogger...